Exploring the Bricks and Beyond #
Continuing from where we left off in our previous post on the Arduino Uno Q, we are now ready to explore the Bricks ecosystem and its capabilities. The bricks are modular components that can be easily connected to the Arduino Uno Q, allowing for rapid prototyping and experimentation. Arduino App Lab can be used to program and control these bricks. While exploring a few bricks, I found a interesting one - called Hey Arduino!. Its a part of Keyword Spotting bricks that allows voice commands to control the Arduino board. This brick can recognize specific keywords and trigger Led Matrix on the Arduino Uno Q.
To install the Hey Arduino! brick, I followed these steps:
- Open the
Arduino App Laband navigate to theExamplessection. - Search for
Hey Arduino!brick and click on theRunbutton to build and install it on the Arduino Uno Q. - Once installed, You can connect a microphone to the Arduino Uno Q to capture voice commands
Hey Arduino!. - Use the
Arduino App Labto program the brick to recognize specific keywords and triggerLed Matrixon the Arduino Uno Q.
It an interesting brick that opens up new possibilities for voice-controlled applications using the Arduino Uno Q. With the Hey Arduino! brick, I can now create projects that respond to voice commands, making it a fun and interactive experience.
But I wasnt satisfied with just exploring the bricks. I wanted to dive deeper into the capabilities of the Arduino Uno Q and explore if I could display any custom messages on the Led Matrix. After going throw the documentation and examples provided by Arduino, I found the ways to achieve this using Arduino App Lab.
Displaying Custom Messages on the Led Matrix #
To display on the LED matrix Arduino Uno Q uses a <Arduino_LED_Matrix.h> library that provides functions to control the LED matrix.
I created a simple html/css js web page that allows users to input custom messages and display them on the LED matrix. You can try it out here. The user interface is quite simple and intuitive. You can use your mouse to draw patterns on the 13*8 grid representing the LED matrix. Once you are satisfied with your design, you can add more frames to create animations.
. The user interface is quite simple and intuitive. You can use your mouse to draw patterns on the 13*8 grid representing the LED matrix. Once you are satisfied with your design, you can add more frames to create animations.
I created a small animation that displays “Hi!” on the LED matrix.
I also created a small Python script that uses similar logic and can parse your c header file and reanimate on command line the animation in basic ascii and unicode version.
import time
import os
import re
import sys
def parse_hex_values(hex_list):
    """
    Parses a list of 32-bit hex values into a single bitstream and returns the first 104 bits.
    """
    full_binary_string = ""
    for hex_val in hex_list:
        binary_string = bin(hex_val)[2:].zfill(32)
        full_binary_string += binary_string

    truncated_bits = full_binary_string[:104]

    bit_array = [int(bit) for bit in truncated_bits]

    return bit_array

if __name__ == "__main__":

    def parse_c_header(filename):
        """
        Parses a C header file to extract the HeartAnim array.
        Returns a list of lists, where each inner list contains the hex values and delay.
        """
        try:
            with open(filename, 'r') as f:
                content = f.read()
            match = re.search(r'\w+\[\]\[\d+\]\s*=\s*\{(.*?)\};', content, re.DOTALL)
            if not match:
                print(f"Error: Could not find a valid animation array in {filename}")
                return None
            array_content = match.group(1)
            rows = re.findall(r'\{([^\}]+)\}', array_content)
            parsed_data = []
            for row in rows:
                items = [item.strip() for item in row.split(',')]
                items = [item for item in items if item]
                row_data = []
                for item in items:
                    try:
                        if item.lower().startswith('0x'):
                            row_data.append(int(item, 16))
                        else:
                            row_data.append(int(item))
                    except ValueError:
                        continue

                if row_data:
                    parsed_data.append(row_data)

            return parsed_data
        except FileNotFoundError:
            print(f"Error: File {filename} not found.")
            return None

    def print_matrix(result, ascii_mode=False):
        if ascii_mode:
            symbols = {0: ".", 1: "o"}
        else:
            symbols = {0: "⬛", 1: "🟦"}
        rows = 8
        cols = 13
        output = []
        for i in range(rows):
            row_start = i * cols
            row_end = row_start + cols
            row_bits = result[row_start:row_end]
            output.append("".join(symbols[b] for b in row_bits))
        print("\n".join(output))

    import argparse
    parser = argparse.ArgumentParser(description="Parse and animate LED matrix data from a C header file.")
    parser.add_argument("filename", nargs="?", default="animation.h", help="Path to the C header file containing the animation array (default: animation.h)")
    parser.add_argument("--ascii", action="store_true", help="Use ASCII characters for legacy terminals")
    args = parser.parse_args()
    filename = args.filename

    anim = parse_c_header(filename)

    if anim:
        try:
            while True:
                for frame in anim:
                    if len(frame) < 5:
                        continue

                    hex_values = frame[:4]
                    delay_ms = frame[4]
                    result = parse_hex_values(hex_values)
                    print("\033[H\033[J", end="")

                    print(f"Animation from {filename} (Ctrl+C to stop)")
                    print_matrix(result, ascii_mode=args.ascii)

                    time.sleep(delay_ms / 1000.0)
        except KeyboardInterrupt:
            print("Animation stopped.")
    else:
        print("Failed to load animation data.")
you can run script and provide your c header file as argument. It will parse the file and display the animation on command line. You can use --ascii flag to use ascii characters for legacy terminals.
it should give you output similar to this depending on your terminal support and input file:
I have shared the code for both the web page and python script on my GitHub repository. Feel free to explore and modify the code to create your own custom animations on the Arduino Uno Q’s LED matrix.
Conclusion #
After generating I copied the read only version of Hey Arduino! example from Arduino App Lab and modified heart_frames.h file to include my custom animation data.
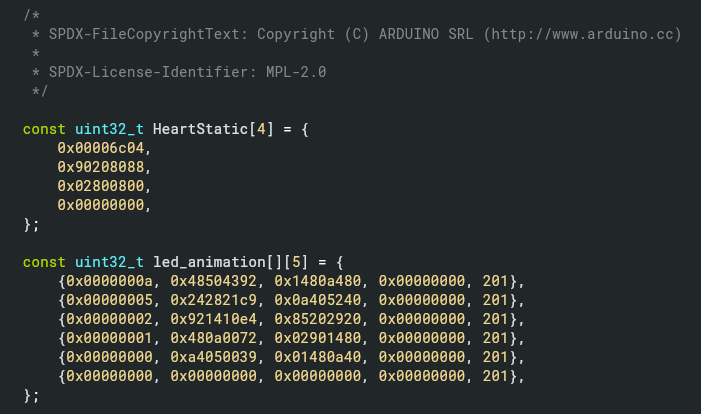
I used led_animation array instead of HeartAnim array in Hey Arduino! example code to display my custom animation on the LED matrix.
Next Steps #
In the next post, I will explore more advanced features of the Arduino Uno Q, including interfacing with external sensors and modules, and creating more complex projects. Stay tuned for more exciting adventures with the Arduino Uno Q!